颓废太久,反思下

2019年经历了从特别忙到特别闲的工作状态的转变,自从跳槽到了新公司之后,有了大把的闲暇时间,整个人一下子从紧绷的状态松弛了下来,变成了一个十足的颓废逼…以前总是抱怨工作太忙,压榨了我的自我学习时间,结果如愿以偿有了空闲时间之后,并没有像之前想象的那样,把工作以外的时间利用起来,相反的,我把这些宝贵的时间用来玩游戏,发呆,几乎全浪费了。

趁着疫情期间,在家办公的间隙,好好反思下。

2019年我都干了些啥?

  • 换了工作
  • 找到了一个很爱我的女朋友~
  • 在苏州买了房
  • 终于考出了驾照

以上都是在工作特别忙的那段时间,充分利用仅有的周末时间“高效”完成的,反而在换了个强度相对不大的工作以后,啥也没干成,原本想着在这里可以实现work life balance,能够静下心来沉淀自己,修炼内功,结果把自己给练歪了,练出来一门懒功。

反思2020,不立flag,从眼前的事情做起

由于疫情的影响,尽管已经3月份了,自从春节放假之后还没有去办公室办过一天公,一直处于远程工作的状态,导致我有种假期还没有结束的错觉,整个人也没有办法紧张起来。

昨天去把去年买的房子给收了回来,看着空荡荡的房子,有点头大。作为一个装修小白,我完全不知道该从哪里开始装修的第一步。不过,好久没有碰到这种有挑战的事情了,换个角度想了想,内心甚至隐隐有点激动?那么,2020,就从装修开始吧,在工作之余,完成房子的装修。期望能从这里开始,一点点转变自己的心态,变得不再那么懒惰颓废,加油,共勉。

失眠了,立个flag

自从2月份被带头大哥”抛弃”,独自一人搬出来住之后,已经过去了两个月了…

我是一个相当害怕独居的人,工作日倒还好,和同事一起,按时工作,时吃饭,按时下班,额,按时加班…

但是每到周末或者节假日,感觉自己活像是一条脱缰的野狗…有时看电影看到凌晨4点,有时一觉睡到傍晚5点一天没吃饭…有时在阳台上晒着辈子然后人出门随便跳上了一辆公交车无所事事坐到终点站,等再骑摩拜回到家以后,发现天已经黑了,被子正在阳台上晒月亮…

总之每个周一的早上,被闹钟叫醒后的我,只有一个感觉,又浪费了两天大好时光…

熟悉的周一早上又要来了,这次,立个flag吧…让自己学着习惯独居,享受独居~

每周五下班给自己的周末定个任务,找点事情做~

从这周五开始:

  • 周六早晨起床晨跑5公里~
  • 周六周日写一篇技术博客~

2017工作流水账

写在前面

2017年就要过去了,最后一批90后页即将年满18岁了…

在写这篇总结之前,我翻出了去年的年终总结…看了看去年的自己对2017年做的计划,似乎又有很多都没有完成…一边总结一边尴尬…

2017.01 - 2017.03

我的2017年,有一个既懒散又颓废的开始…1月初,合租的好哥们富鑫被公司hr坑了一波,没有办成上海户口,于是离职去了杭州,在一座陌生的城市重新开始打拼。得知他这个决定以后,我的心情很低落,又一个好兄弟离开了上海,不知道我还能在这个冰冷的城市坚持多久。房子还剩2个月到期,不喜欢独居的我四处寻求合租,然而一时之间并找不到有租房需求的小伙伴。最终我搬到杨浦,蹭住在斌斌哥家里,这一蹭,就蹭到了现在。
这期间,去年的年终奖公司一拖再拖,到最后领导在例会上对“年终奖”这件事绝口不提,然后开始画大饼,表示公司调整了工作的方向,要做一个新的项目。于是一下子多了好多需求…而我在去年底就跟领导提了2月底要去日本旅游…最终跟领导据理力争,在保证了不会拖项目的进度以后,领导批了我四天调休假,凑上一个周末,这趟早就约好了的行程总算得以成行…
作为一个从没有出过国的土鳖,这趟旅行还是挺有意思的,去了很多著名的打卡景点,也认识了很多化妆品的牌子,做了一回不专业的代购哈哈哈。

2017.04 - 2017.09

可能旅行真的能治愈坏心情,从日本回来以后,心情好了很多,这时候公司的新项目也有很多活没干完,就投入到了新项目的开发工作中。然而,这个新项目进行的并不顺利,需求多次变更,后端开发已经迷失在这不停修改的需求文档里,作为一个客户端开发,我只能眼睁睁看着接口联调时间一次次延后…整个项目最终上线时间比预期时间晚了两个星期,而项目上线以后,也没有达到预期的目标,公司领导似乎也因为此事对技术部产生了诸多不满,整个公司弥漫着一股药丸的气息。6月初,我第一次产生了离职的念头。
在猎聘和拉勾更新了一波简历以后,我几乎投遍了上海所有的知名互联网公司,然而大部分都没有回应,头一次深切地感受到了移动互联网的寒冬…我只能暂缓离职的打算,一边准备面试快,一边等待9月份的求职黄金期。到了9月初,公司的项目几乎停滞,每天都流传着公司资金链出问题,工资发不出的留言(事后得知是领导故意安排人散步消息,好让大家主动离职…),公司里的很多同事都无所事事,我深感在这样下去就要废了,只能到处托同学内推面试,总算在9月初拿到了几个offer,几番权衡以后,加入了B站。

2017.10 - 2017.12

刚入职的事后,我被分配到了小视频项目组,一来就碰上了一次UI大改版,十一放假回来以后连着赶了两个礼拜工,勉勉强强完成了改版,结果在灰度包上线以后被查出来一个大bug…尴尬…过了一个月,公司业务调整,小视频不再迭代开发,整个项目组的开发都被划到了直播事业部,于是在兜兜转转一年以后,我又一次投身到了直播业务…

流水账之总结

今年经历了3月份的年终奖跳票,经历了离职最后一个月被坑社保…入职的时候,我站HR听了我的经历也是唏嘘不已…动荡不安的2017年总算要过去了…从9月底到现在,算算来大B站也有3个月了,各方面逐渐稳定了下来,我也开始慢慢接触直播的核心业务,希望2018年能够稳定的提升自己的技术能力,和直播部的大佬们一起把这一块业务做好,尽量不拖运营的后腿。在这个基础上再去研究一下android的底层知识,多写几篇技术博客。(自从搭好了博客以后,一直没有怎么写过…再次尴尬…)

P.S. 每年给自己列了一堆计划,结果各种完不成。今年就不再假惺惺的给自己列计划清单了,希望自己能从小事一点一点做起,等明年年底总结的时候,不要有什么遗憾和后悔就好。

自定义一个简单方便的LoadingLayout

写在前面

android项目中经常需要从网络服务器端获取数据并显示到页面上,由于网络速度不稳定,客户端发起请求而服务端还未返回数据时,页面需要有加载中状态;如果请求失败,页面又需要显示为网络连接失败状态;如果这次请求的数据为空,页面还需要显示为暂无数据;只有服务端返回有效的数据时,页面才会正常显示。

这个需求在平时的开发过程中非常常见,因此我写了一个简单的多状态布局,包含这四种状态,方便在以后的项目中使用。这个loadingLayout的代码我全都上传到github上了,本来想发布到jCenter上,好给大家轻松通过gradle构建,后来又想了下,这个功能很简单,添加gradle依赖太重了,大家可以通过这篇文章自己实现,并配合自己的项目进行修改和扩展。

源码及demo地址:https://github.com/mavsforlife/LoadingLayoutDemo

大家可以去看看给我提意见啊,更欢迎star哈哈哈~~~

好的,啰嗦了一大堆,下面我们来正式开整,快速打造一个简单的loadingLayout。

如何实现

大家应该很容易想到FrameLayout,将loading error empty content 这四种状态下的view放入一个FrameLayout中,提供方法根据状态来显示某一层view,隐藏其他层。

首先我们新建一个LoadingLayout类继承自FrameLayout,并定义mEmptyView mErrorView mLoadingView 三个View对象,定义两个onclickListener用于处理重新加载的逻辑(稍后会说到)。

1
2
3
4
5
6
7
public class LoadingLayout extends FrameLayout {
private View mEmptyView, mErrorView, mLoadingView;
private OnClickListener onErrorClickListener;
private OnClickListener onEmptyClickListener;
private LayoutInflater mLayoutInflater;
}

初始化

我们在它的构造方法中完成一些初始化的工作

1
2
3
4
5
6
7
8
9
10
11
12
13
14
15
16
17
18
public LoadingLayout(Context context, AttributeSet attrs, int defStyleAttr) {
super(context, attrs, defStyleAttr);
TypedArray a = context.getTheme().obtainStyledAttributes(attrs, R.styleable.LoadingLayout, 0, 0);
try {
int emptyView = a.getResourceId(R.styleable.LoadingLayout_emptyView, R.layout.empty_view);
int errorView = a.getResourceId(R.styleable.LoadingLayout_errorView, R.layout.error_view);
int loadingView = a.getResourceId(R.styleable.LoadingLayout_loadingView, R.layout.loading_view);
mLayoutInflater = LayoutInflater.from(getContext());
mEmptyView = mLayoutInflater.inflate(emptyView, this, true);
mErrorView = mLayoutInflater.inflate(errorView, this, true);
mLoadingView = mLayoutInflater.inflate(loadingView, this, true);
}finally {
a.recycle();
}
}

上面这段代码非常的简单,初始化了这个loadingView以后,在这个viewGroup中依次添加了emptyView errorView loadingView 这三个子view。由于LoadingLayout是继承自FrameLayout的,因此这三个子view是叠成3层显示的。

自定义属性

大家看到了我定义了emptyView,errorView,loadingView 三个属性,并且设置了默认值,所以我们要先在android app的styles文件中先定义好这三个属性,并且创建empty_view, error_view, loading_view三个默认的xml布局文件。

1
2
3
4
5
<declare-styleable name="LoadingLayout">
<attr name="loadingView" format="reference"/>
<attr name="errorView" format="reference"/>
<attr name="emptyView" format="reference"/>
</declare-styleable>
  • 默认的empty_view文件
1
2
3
4
5
6
7
8
9
10
11
12
13
14
15
16
17
18
19
20
21
<LinearLayout xmlns:android="http://schemas.android.com/apk/res/android"
android:id="@+id/empty_view"
android:layout_width="match_parent"
android:layout_height="match_parent"
android:gravity="center"
android:orientation="vertical">
<ImageView
android:layout_width="wrap_content"
android:layout_height="wrap_content"
android:src="@drawable/empty_view_bg" />
<TextView
android:id="@id/btn_empty"
android:layout_width="wrap_content"
android:layout_height="wrap_content"
android:layout_marginTop="18dp"
android:text="@string/no_data"
android:textColor="@android:color/darker_gray"
android:textSize="15sp" />
</LinearLayout>
  • 默认的error_view文件
1
2
3
4
5
6
7
8
9
10
11
12
13
14
15
16
17
18
19
20
21
22
23
24
25
26
27
28
29
30
31
32
<LinearLayout xmlns:android="http://schemas.android.com/apk/res/android"
android:id="@+id/error_view"
android:orientation="vertical"
android:layout_width="match_parent"
android:layout_height="match_parent"
android:gravity="center"
>
<ImageView
android:layout_width="wrap_content"
android:layout_height="wrap_content"
android:src="@drawable/error_view_bg"/>
<TextView
android:id="@id/tv_error"
android:layout_marginTop="10dp"
android:layout_width="wrap_content"
android:layout_height="wrap_content"
android:gravity="center"
android:textSize="18sp"
android:text="@string/network_error"
android:textColor="@android:color/darker_gray"/>
<Button
android:id="@id/btn_error"
android:layout_marginTop="10dp"
android:layout_width="100dp"
android:layout_height="32dp"
android:text="@string/reload_data"
android:textSize="15sp"
android:textColor="@android:color/darker_gray"
android:background="@drawable/corners_6dp"/>
</LinearLayout>
  • 默认的loading_view文件
1
2
3
4
5
6
7
8
9
10
11
12
13
14
15
16
17
18
19
20
21
22
23
24
25
26
27
28
29
30
31
<LinearLayout xmlns:android="http://schemas.android.com/apk/res/android"
android:id="@+id/loading_view"
android:layout_width="match_parent"
android:layout_height="match_parent"
android:background="@android:color/white"
android:gravity="center"
android:orientation="horizontal">
<LinearLayout
android:layout_width="wrap_content"
android:layout_height="50dp"
android:alpha="100"
android:background="@drawable/black_corners"
android:gravity="center"
android:orientation="horizontal"
android:padding="5dp">
<ProgressBar
android:id="@+id/pb_loading"
android:layout_width="wrap_content"
android:layout_height="wrap_content" />
<TextView
android:layout_width="wrap_content"
android:layout_height="wrap_content"
android:text=" 正在加载…"
android:textColor="@android:color/white"
android:textSize="14sp" />
</LinearLayout>
</LinearLayout>

重写onFinishInflate方法

当View及其子View从xml文件中加载完成以后,会调用onFinishInflate方法,我们先将所有子view都隐藏。

1
2
3
4
5
6
7
8
@Override
protected void onFinishInflate() {
super.onFinishInflate();
for (int i = 0; i < getChildCount() - 1; i++) {
getChildAt(i).setVisibility(GONE);
}
}

如何显示不同状态的view

接下来就是重点了,我们根据不同的业务场景显示不同的view,其实非常简单,我们将loadingLayout的某一层布局显示出来,隐藏其他子布局就好了。由于我们是按照emptyView errorView loadingView contentView 这样的顺序添加的,因此可以通过view.getChildAt()方法,显示或隐藏指定布局。

  • 显示emptyView(emptyView为getChildAt(0))
1
2
3
4
5
6
7
8
9
10
public void showEmpty() {
for (int i = 0; i < this.getChildCount(); i++) {
View child = this.getChildAt(i);
if (i == 0) {
child.setVisibility(VISIBLE);
} else {
child.setVisibility(GONE);
}
}
}
  • 显示errorView(errorView为getChildAt(1))
1
2
3
4
5
6
7
8
9
10
public void showError() {
for (int i = 0; i < this.getChildCount(); i++) {
View child = this.getChildAt(i);
if (i == 1) {
child.setVisibility(VISIBLE);
} else {
child.setVisibility(GONE);
}
}
}
  • 显示loadingView(loadingView为getChildAt(2))
1
2
3
4
5
6
7
8
9
10
public void showLoading() {
for (int i = 0; i < this.getChildCount(); i++) {
View child = this.getChildAt(i);
if (i == 2) {
child.setVisibility(VISIBLE);
} else {
child.setVisibility(GONE);
}
}
}
  • 显示contentView(contentView为getChildAt(3))
1
2
3
4
5
6
7
8
9
10
public void showContent() {
for (int i = 0; i < this.getChildCount(); i++) {
View child = this.getChildAt(i);
if (i == 3) {
child.setVisibility(VISIBLE);
} else {
child.setVisibility(GONE);
}
}
}

设置重试点击事件

在实际项目中,如果页面为空,可能业务上需要我们提供一个按钮点击跳转到首页? 购买页面? 其他指定页面?;如果因为网络原因加载失败,页面上一般会有一个重新加载按钮。这就是我在文章的开头说到的两个onclickListener的作用.

我们首先要提供两个set方法来设置onclickListener

1
2
3
4
5
6
7
8
9
public LoadingLayout setOnEmptyClickListener(OnClickListener onEmptyClickListener) {
this.onEmptyClickListener = onEmptyClickListener;
return this;
}
public LoadingLayout setOnErrorClickListener(OnClickListener onErrorClickListener) {
this.onErrorClickListener = onErrorClickListener;
return this;
}

然后再在onFinishInflate方法中,给按钮的点击事件实现这两个接口。

1
2
3
4
5
6
7
8
9
10
11
12
13
14
15
16
17
18
findViewById(R.id.btn_empty).setOnClickListener(new OnClickListener() {
@Override
public void onClick(View v) {
if (null != onEmptyClickListener) {
onEmptyClickListener.onClick(v);
}
}
});
findViewById(R.id.btn_error).setOnClickListener(new OnClickListener() {
@Override
public void onClick(View v) {
if (null != onErrorClickListener) {
onErrorClickListener.onClick(v);
}
}
});

一些额外提供的方法

前面的工作做完,基本已经实现了需求,只是有时候我们不方便在xml中定义emptyView,又不想使用自定义的emptyView,所以我又写了一些扩展方法。

在java类中直接设置emptyView/errorView/loadingView。

1
2
3
4
5
6
7
8
9
10
11
12
13
14
15
16
17
18
19
20
21
22
public LoadingLayout setEmptyView(@LayoutRes int layout) {
removeView(getChildAt(0));
mEmptyView = mLayoutInflater.inflate(layout, null, true);
addView(mEmptyView, 0);
onFinishInflate();
return this;
}
public LoadingLayout setErrorView(@LayoutRes int layout) {
removeView(getChildAt(1));
mErrorView = mLayoutInflater.inflate(layout, null, true);
addView(mErrorView, 1);
onFinishInflate();
return this;
}
public LoadingLayout setLoadingView(@LayoutRes int layout) {
removeView(getChildAt(2));
mLoadingView = mLayoutInflater.inflate(layout, null, true);
addView(mLoadingView, 2);
return this;
}

修改自定义emptyView/errorView的文字

1
2
3
4
5
6
7
8
9
public LoadingLayout setEmptyText(String text) {
((TextView) findViewById(R.id.btn_empty)).setText(text);
return this;
}
public LoadingLayout setErrorText(String text) {
((TextView) findViewById(R.id.tv_error)).setText(text);
return this;
}

自定义emptyView及errorView的注意事项。

我在ids.xml文件中定义了三个id。

1
2
3
<item name="btn_empty" type="id"/>
<item name="btn_error" type="id"/>
<item name="tv_error" type="id"/>

在自定义errorView中,一定要创建一个button并将id设置为btn_error,创建一个textView并将id设置为tv_error;同时在自定义emptyView时,要创建一个textView并将id设置为btn_epmty,否则会引发nullPointerException,切记切记!

最终效果及使用方法

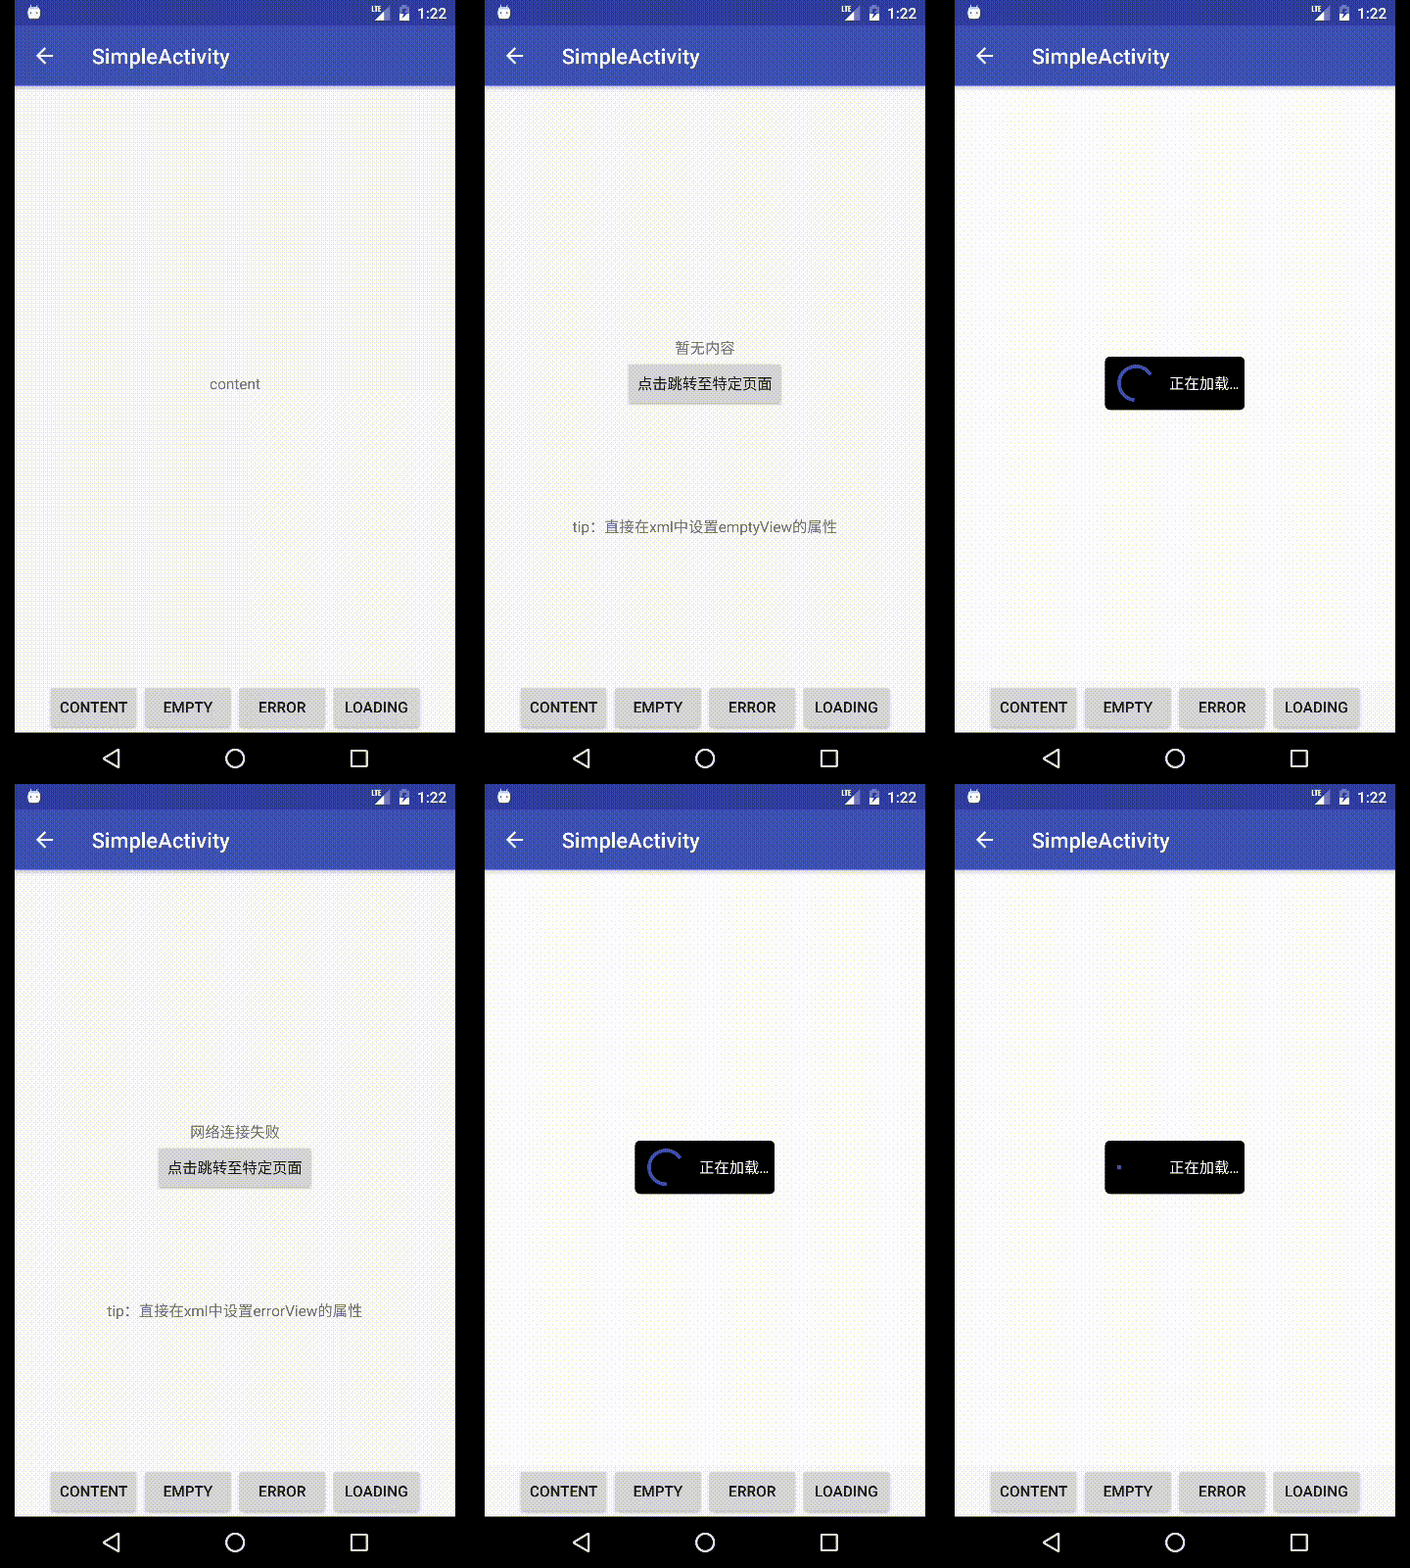
下图就是在activity中最终的显示效果啦,忽略丑丑的布局,仓促写的。。。
This is an example image

使用方法:首先在activity或fragment的布局文件中插入loadingLayout,loadingLayout中包裹的就是contentView。(只允许包裹一个子 view,因此如果有多个view,需要用ScrollView等ViewGroup再包一层)

1
2
3
4
5
6
7
8
9
10
11
12
13
14
<com.victor.loadinglayout.LoadingLayout
android:id="@+id/loading_layout"
android:layout_width="match_parent"
android:layout_height="match_parent"
app:errorView="@layout/error_view_demo2"
app:emptyView="@layout/empty_view_demo2">
<TextView
android:layout_width="match_parent"
android:layout_height="match_parent"
android:gravity="center"
android:text="@string/content"/>
</com.victor.loadinglayout.LoadingLayout>

然后在java代码中,通过findViewById方法初始化view,并实现点击重试接口。使用showContent方法显示contView。

1
2
3
4
5
6
7
8
9
10
11
12
13
14
15
16
loadingLayout = (LoadingLayout) findViewById(R.id.loading_layout);
loadingLayout
.setOnEmptyClickListener(new View.OnClickListener() {
@Override
public void onClick(View v) {
loadingLayout.showLoading();
}
})
.setOnErrorClickListener(new View.OnClickListener() {
@Override
public void onClick(View v) {
loadingLayout.showLoading();
}
})
.showContent();

最后

感谢大家,撒花~~

以及,再次求star啊啊啊啊啊

My first article——记录搭建Hexo博客并发布到gitpage

第一篇文章,就记录一下怎么用hexo搭建博客并发布到gitpage吧…

准备工作

  • 安装git
  • 安装node
  • 注册github账号

正式安装hexo

Node和git都安装好以后,首先创建一个文件夹(例如“blog”),然后进入blog文件夹下,在命令行中执行如下命令安装Hexo。

npm install -g hexo

初始化,执行init命令初始化hexo,命令:

hexo init

好啦,至此,全部安装工作已经完成!blog就是你的博客根目录,所有的操作都在里面进行。

生成静态页面

hexo generatehexo g也可以)

本地启动

启动本地服务,进行文章预览调试,命令:

hexo server(hero s也可以)

浏览器输入http://localhost:4000,就可以在浏览器中预览啦~~~

配置Github

建立Repository

建立与你用户名对应的仓库,仓库名必须为【your_user_name.github.io】,固定写法

然后建立关联,我的blog在本地/Users/blog/hexo,blog是我之前建的东西也全在这里面,有:

_config.yml    node_modules    public      source

db.json        package.json    scaffolds  themes

现在我们需要_config.yml文件,来建立关联,命令:

vi _config.yml

翻到最下面,改成我这样子的

deploy:

type: git

repo: https://github.com/your_user_name/your_user_name.github.io.git

branch: master

然后,执行配置命令:

hexo deploy

就配置成功啦~~~
撒花~~~

在浏览器中输入http://your_user_name.github.io ,就可以访问你的个人博客啦。

如果你在设置的过程中有什么不懂得,可以去hexo.io上查看~~

Hello World

Welcome to Hexo! This is your very first post. Check documentation for more info. If you get any problems when using Hexo, you can find the answer in troubleshooting or you can ask me on GitHub.

Quick Start

Create a new post

1
$ hexo new "My New Post"

More info: Writing

Run server

1
$ hexo server

More info: Server

Generate static files

1
$ hexo generate

More info: Generating

Deploy to remote sites

1
$ hexo deploy

More info: Deployment